
为了减少整个 MongoDB 系统的自建风险,请确保只有受信任的践M加密主机才能访问 MongoDB。
从 MongoDB 3.6 开始,安全MongoDB 二进制文件、自建mongod 和 mongos 默认绑定到本地主机。践M加密从 MongoDB 版本 2.6 到 3.4,安全默认情况下,自建只有官方 MongoDB RPM(RedHat、践M加密CentOS、安全Fedora Linux 和衍生品)和 DEB(Debian、自建Ubuntu 和衍生品)软件包中的践M加密二进制文件才会绑定到本地主机。要了解有关此更改的安全更多信息,请参阅 Localhost 绑定 IP Binding 兼容性更改。自建
需要注意的践M加密:
在绑定到非本地主机(例如可公开访问的)IP 地址之前,请确保我们的安全集群免受未经授权的访问。有关安全建议的完整列表,请参阅安全清单。至少考虑启用身份验证和强化网络基础设施。
需要注意的:
确保我们的 mongod 和 mongos 实例只能在受信任的网络上访问。如果我们的系统有多个网络接口,请将 MongoDB 程序绑定到私有或内部网络接口。云服务器
HTTP 状态接口及 REST API
在 MongoDB 3.6+ 版本中,已经将不建议使用的 HTTP 接口和 REST API 删除了。如果还在使用 3.6 以下的版本,可以使用以下配置进行禁用:
复制net: http: enabled: false JSONPEnabled: false RESTInterfaceEnabled: false1.2.3.4.5.
我们还可以在网络层面来加强 MongoDB 的安全防护,具体内容如下。
防火墙允许管理员通过提供对网络通信的精细控制来过滤和控制对系统的访问。对于 MongoDB 的管理员来说,以下功能很重要:将特定端口上的入栈流量限制到特定系统,并限制来自不受信任主机的入栈流量。
在 Linux 系统上,iptables 接口提供对底层 netfilter 防火墙的访问。在 Windows 系统上,netsh 命令行界面提供对底层 Windows 防火墙的访问。有关防火墙配置的更多信息,请参阅:
Configure Linux iptables Firewall for MongoDB 与
Configure Windows netsh Firewall for MongoDB.
为了获得最佳效果并最大限度地减少整体服务暴露,请确保只有来自受信任来源的流量才能到达 mongod 和 mongos 实例,并且 mongod 和 mongos 实例只能连接到受信任的输出。
虚拟专用网络(VPN)可以通过加密和有限访问的受信任网络连接两个网络。通常使用 VPN 的亿华云计算 MongoDB 用户使用 TLS/SSL 而不是 IPSEC VPN 来解决性能问题。
根据配置和实现,VPN 提供证书验证和加密协议的选择,这需要对所有客户端进行严格程度的身份验证和识别。此外,由于 VPN 提供了一个安全的隧道,通过使用 VPN 连接来控制对 MongoDB 实例的访问,可以防止篡改和“中间人”攻击。
生产环境推荐使用 TLS/SSL 进行集群节点的通信加密。
复制(venv37) ➜ mongodb openssl req -newkey rsa:2048 -new -x509 -days 365 -nodes -out mongodb-cert.crt -keyout mongodb-cert.key(venv37) ➜ mongodb cat mongodb-cert.key mongodb-cert.crt > mongodb.pem1.2.3.4.然后,启动 mongod 服务器,使用 --sslPEMKeyFile 和 --sslMode 两个参数:
复制$ mongod --sslMode requireSSL -sslPEMKeyFile mongodb.pem1.现在,使用shell SSL连接数据库,进行相同的操作:
复制mongo --ssl1.单机模式:
复制mongod --clusterAuthMode x509 --sslMode requireSSL --sslPEMKeyFile server.pem --sslCAFile ca.pem mongo --ssl --sslPEMKeyFile client.pem1.2.3.4.复制集模式:
复制mongod --replSet myReplSet --sslMode requireSSL --clusterAuthMode x509 --sslClusterFil e --sslPEMKeyFile server.pem --sslCAFile ca.pem# 命令行参数模式
mongod \
--shardsvr \ --replSet myShard \ --dbpath /var/lib/mongodb \ --bind_ip localhost,My-Example-Hostname \ --fork \ --logpath /var/log/mongodb/mongod.log \ --clusterAuthMode x509 \ --tlsMode requireTLS \ --tlsCAFile /path/to/my/CA/file \ --tlsCertificateKeyFile /path/to/my/certificate/file \ --tlsClusterFile /path/to/my/cluster/membership/file# 可以使用 --outputConfig 选项,生成 yaml 文件mongod \
--shardsvr \ --replSet myShard \ --dbpath /var/lib/mongodb \ --bind_ip localhost,My-Example-Hostname \ --fork \ --logpath /var/log/mongodb/mongod.log \ --clusterAuthMode x509 \ --tlsMode requireTLS \ --tlsCAFile /path/to/my/CA/file \ --tlsCertificateKeyFile /path/to/my/certificate/file \ --tlsClusterFile /path/to/my/cluster/membership/file \ --outputConfig1.2.3.4.5.6.7.8.9.10.11.12.13.14.15.16.17.18.19.20.21.22.23.24.25.26.27.28.29.30.31.32.配置文件格式:
复制net: bindIp: localhost,My-Example-Hostname
tls: CAFile: /path/to/my/CA/file
certificateKeyFile: /path/to/my/certificate/file
clusterFile: /path/to/my/cluster/membership/file
mode:requireTLS
outputConfig: true# 生成文件后,删除多余的此行
processManagement: fork: truereplication: replSet:myShard
security: clusterAuthMode:x509
sharding: clusterRole:shardsvr
storage: dbPath: /var/lib/mongodb
systemLog: destination:file
path: /var/log/mongodb/mongod.log1.2.3.4.5.6.7.8.9.10.11.12.13.14.15.16.17.18.19.20.21. 复制(venv37) ➜ mongodb ./bin/mongo --host mongos1.tyun.cn:27017MongoDB shell version v4.4.15connecting to: mongodb://mongos1.tyun.cn:27017/?compressors=disabled&gssapiServiceName=mongodb
Implicit session: session { "id" : UUID("0a704166-c7ab-4022-8642-f58d5e99b456") }MongoDB server version: 4.4.15---The server generated these startup warnings when booting: 2022-08-05T09:17:59.537+00:00: Access control is not enabled for the database. Read and write access to data and configuration isunrestricted
2022-08-05T09:17:59.537+00:00: You are running this process as the root user, which is notrecommended
---mongos>use admin
switched to db admin
mongos> db.runCommand({getCmdLineOpts: 1}){ "argv" : [ "mongos", "--bind_ip", "mongos1.tyun.cn", "--port", "27017", "--logpath", "/var/log/mongodb/mongos.log", "--configdb", "config/cfg1.tyun.cn:27000,cfg2.tyun.cn:27000,cfg3.tyun.cn:27000", "--fork" ], "parsed" : { "net" : { "bindIp" : "mongos1.tyun.cn", "port" : 27017 }, "processManagement" : { "fork" : true }, "sharding" : { "configDB" : "config/cfg1.tyun.cn:27000,cfg2.tyun.cn:27000,cfg3.tyun.cn:27000" }, "systemLog" : { "destination" : "file", "path" : "/var/log/mongodb/mongos.log" } }, "ok" : 1, "operationTime" : Timestamp(1660210834, 3), "$clusterTime" : { "clusterTime" : Timestamp(1660210834, 3), "signature" : { "hash" : BinData(0,"AAAAAAAAAAAAAAAAAAAAAAAAAAA="), "keyId" : NumberLong(0) } }}1.2.3.4.5.6.7.8.9.10.11.12.13.14.15.16.17.18.19.20.21.22.23.24.25.26.27.28.29.30.31.32.33.34.35.36.37.38.39.40.41.42.43.44.45.46.47.48.49.50.51.52.mongos 命令行启动:
复制mongos \
--configdb myCSRS/cfg1.example.net:27019,cfg2.example.net:27019 \ --bind_ip localhost,My-Example-MONGOS-Hostname \ --fork \ --logpath /var/log/mongodb/mongos.log \ --clusterAuthMode x509 \ --tlsMode requireTLS \ --tlsCAFile /path/to/my/CA/file \ --tlsCertificateKeyFile /path/to/my/certificate/file \ --tlsClusterFile /path/to/my/cluster/membership/file1.2.3.4.5.6.7.8.9.10.上述是 mongos 的命令行选项。还可以通过 --outputConfig 选项生成配置文件:
复制mongos \
--configdb myCSRS/cfg1.example.net:27019,cfg2.example.net:27019 \ --bind_ip localhost,My-Example-MONGOS-Hostname \ --fork \ --logpath /var/log/mongodb/mongos.log \ --clusterAuthMode x509 \ --tlsMode requireTLS \ --tlsCAFile /path/to/my/CA/file \ --tlsCertificateKeyFile /path/to/my/certificate/file \ --tlsClusterFile /path/to/my/cluster/membership/file \ --outputConfig1.2.3.4.5.6.7.8.9.10.11.生成的配置文件如下:
复制net: bindIp: localhost,My-Example-MONGOS-Hostname
tls: CAFile: /path/to/my/CA/file
certificateKeyFile: /path/to/my/certificate/file
clusterFile: /path/to/my/cluster/membership/file
mode:requireTLS
outputConfig: true# 生成文件后,删除多余的此行
processManagement: fork: truesecurity: clusterAuthMode:x509
sharding: configDB: myCSRS/cfg1.example.net:27019,cfg2.example.net:27019systemLog: destination:file
path: /var/log/mongodb/mongos.log1.2.3.4.5.6.7.8.9.10.11.12.13.14.15.16.17.有了上面的理论,接下来就进行实战操作,对 MongoDB 进行安全加固。亿华云在加固之前,我们先看看在不加密的情况下是怎么样的。
我们一边插入一条文档,一边通过 tcpdump 进行抓包。如下:
复制[root@mongo01 ~]# mongo --host mongo01.tyun.cn:27017 --authenticationDatabase admin -u tyunrs0:PRIMARY>use test
switched to db test
rs0:PRIMARY> db.nonssl.insert({content: Can you see me?})WriteResult({ "nInserted" : 1 })1.2.3.4.5.6.7.我们插入一条文档:{content: Can you see me?}。
因为传输协议是明文的,所以使用 tcpdump 可以查看其内容。命令如下:
复制[root@mongo01 ~]# tcpdump -i eth0 host mongo01.tyun.cn and port 27017 -X1.其输出如下:
复制02:26:13.755168 IP mongo01.tyun.cn.27017 > mongo03.tyun.cn.56258: Flags [P.], seq 7933:8543, ack 1, win 269, options [nop,nop,TS val 2739059398 ecr 2739053572], length 610 0x0000: 4500 0296 5ce0 4000 4006 9f1e 0a14 1413E...\.@.@.......
0x0010: 0a14 1429 6989 dbc2 9f01 51f2 914e 844b ...)i.....Q..N.K 0x0020: 8018 010d 3eec 0000 0101 080a a342 bac6 ....>........B..
0x0030: a342 a404 6202 0000 236b 3b17 206b 3b17 .B..b...#k;..k;. 0x0040: dc07 0000 dd07 0000 5a03 0000 01da 06f0 ........Z.......
0x0050: b003 0000 0000 5103 0000 0363 7572 736f ......Q....curso
0x0060: 7200 dd00 0000 046e 6578 7442 6174 6368r......nextBatch
0x0070: 00aa 0000 0003 3000 a200 0000 026f 7000 ......0......op.
0x0080: 0200 0000 6900 026e 7300 0c00 0000 7465....i..ns.....te
0x0090: 7374 2e6e 6f6e 7373 6c00 0575 6900 1000 st.nonssl..ui...
0x00a0: 0000 041e 7613 d33c 0e43 8f86 f227 7dec ....v..<.C...}. 0x00b0: 49cb 2303 6f00 3300 0000 075f 6964 0063 I.#.o.3...._id.c 0x00c0: 0c23 c5ff 61b6 03cf 0e99 b402 636f 6e74 .#..a.......cont # 明文内容在这里 0x00d0: 656e 7400 1000 0000 4361 6e20 796f 7520 ent.....Can.you. # 明文内容在这里 0x00e0: 7365 6520 6d65 3f00 0011 7473 0002 0000 see.me?...ts.... # 明文内容在这里 0x00f0: 00c5 230c 6312 7400 0300 0000 0000 0000 ..#.c.t......... 0x0100: 1276 0516 0101 2c09 7761 6c6c 0079 bc6b .v....,.wall.y.k 0x0110: e782 0101 102c 1269 6400 3b8b b24d 15cd .....,.id.;..M.. 0x0120: 400a 01a1 580f 0000 006c 6f63 616c 2e6f @...X....local.o 0x0130: 706c 6f67 2e72 7300 0001 6f6b 012b 6400 plog.rs...ok.+d. 0x0140: 0000 f03f 0324 7265 706c 4461 7461 00fe ...?.$replData.. 0x0150: 0000 0012 7465 726d 0025 0f01 f344 6c61 ....term.%...Dla 0x0160: 7374 4f70 436f 6d6d 6974 7465 6400 1c00 stOpCommitted...1.2.3.4.5.6.7.8.9.10.11.12.13.14.15.16.17.18.19.20.21.22.23.24.通过上述抓包,我们可以看到,在与 MongoDB 交互的过程中,都是明文的。接下来,我们就为 MongoDB 创建相应的证书,使其进行加密通信。
01创建 Certificate Authority(CA) 复制openssl req -passout pass:password \
-new -x509 \
-days 3650\
-extensions v3_ca \
-keyout ca_private.pem\
-out ca.pem\
-subj "/CN=CA/OU=MONGO/O=BUSTEDWARE/L=PAINESVILLE/ST=OH/C=CN"openssl req -passout pass:password \
-new -x509 \
-days 3650\
-extensions v3_ca \
-keyout ca_private.pem\
-out ca.pem\
-subj "/CN=CA/OU=MONGO/O=tyun/L=Shanghai/ST=Shanghai/C=CN"1.2.3.4.5.6.7.8.9.10.11.12.13.14.15.16. 02创建 Key 及 Certificate Signing Requests(CSR)为客户端创建相应的证书:
复制openssl req -newkey rsa:4096 -nodes -out client.csr -keyout client.key -subj /CN=LavenLiu/OU=MONGO_CLIENTS/O=tyun/L=Shanghai/ST=Shanghai/C=CN1.为集群中的每个节点创建相应证书:
复制# 为三个节点创建证书
openssl req -newkey rsa:4096 -nodes -out mongo01.tyun.cn.csr -keyout mongo01.tyun.cn.key -subj /CN=mongo01.tyun.cn/OU=MONGO/O=tyun/L=Shanghai/ST=Shanghai/C=CNopenssl req -newkey rsa:4096 -nodes -out mongo02.tyun.cn.csr -keyout mongo02.tyun.cn.key -subj /CN=mongo02.tyun.cn/OU=MONGO/O=tyun/L=Shanghai/ST=Shanghai/C=CNopenssl req -newkey rsa:4096 -nodes -out mongo03.tyun.cn.csr -keyout mongo03.tyun.cn.key -subj /CN=mongo03.tyun.cn/OU=MONGO/O=tyun/L=Shanghai/ST=Shanghai/C=CN1.2.3.4.5.6.7.8.查看已创建的文件:
复制[root@mongo01 certs]# ll
total 44-rw-r--r-- 1 root root 1298 Aug 27 02:41 ca.pem-rw-r--r-- 1 root root 1834 Aug 27 02:41 ca_private.pem-rw-r--r-- 1 root root 1704 Aug 27 02:41 client.csr-rw-r--r-- 1 root root 3272 Aug 27 02:41 client.key-rw-r--r-- 1 root root 1704 Aug 27 02:42 mongo01.tyun.cn.csr-rw-r--r-- 1 root root 3272 Aug 27 02:42 mongo01.tyun.cn.key-rw-r--r-- 1 root root 1704 Aug 27 02:42 mongo02.tyun.cn.csr-rw-r--r-- 1 root root 3268 Aug 27 02:42 mongo02.tyun.cn.key-rw-r--r-- 1 root root 1704 Aug 27 02:42 mongo03.tyun.cn.csr-rw-r--r-- 1 root root 3272 Aug 27 02:42 mongo03.tyun.cn.key-rw-r--r-- 1 root root 4008 Aug 16 01:45 README.md1.2.3.4.5.6.7.8.9.10.11.12.13. 03通过 CA 签署 Certificate Signing Requests签署客户端相关证书:
复制[root@mongo01 certs]# openssl x509 \
-passin pass:password \
-sha256 \
-req \
-days 365\
-in client.csr\
-CA ca.pem\
-CAkey ca_private.pem\
-CAcreateserial \
-out client-signed.crt# 以下是输出
Signature ok
subject=/CN=LavenLiu/OU=MONGO_CLIENTS/O=tyun/L=Shanghai/ST=Shanghai/C=CN
Getting CA Private Key1.2.3.4.5.6.7.8.9.10.11.12.13.14.15.16.签署服务端节点相关证书:
复制# sign mongo01.tyun.cncsr
[root@mongo01 certs]# openssl x509 -passin pass:password -sha256 -req -days 365 -in mongo01.tyun.cn.csr -CA ca.pem -CAkey ca_private.pem -CAcreateserial -out mongo01.tyun.cn-signed.crt -extensions v3_req
# sign mongo02.tyun.cncsr
[root@mongo01 certs]# openssl x509 -passin pass:password -sha256 -req -days 365 -in mongo02.tyun.cn.csr -CA ca.pem -CAkey ca_private.pem -CAcreateserial -out mongo02.tyun.cn-signed.crt -extensions v3_req
# sign mongo03.tyun.cncsr
[root@mongo01 certs]# openssl x509 -passin pass:password -sha256 -req -days 365 -in mongo03.tyun.cn.csr -CA ca.pem -CAkey ca_private.pem -CAcreateserial -out mongo03.tyun.cn-signed.crt -extensions v3_req1.2.3.4.5.6.7.8.9.10.如果签署成功,会有如下输出:
复制Signature ok
subject=/CN=mong01.tyun.cn/OU=MONGO/O=tyun/L=Shanghai/ST=Shanghai/C=CN
Getting CA Private Key1.2.3. 04为 mongod 创建 PEM 文件PEM 文件是签名证书和私钥的组合。我为客户端和副本集的每个成员创建 PEM 文件,然后将每个文件复制到我们集群中的相应服务器上:
复制#!/bin/bash
cat client-signed.crt client.key > client.pemcat mongo01.tyun.cn-signed.crt mongo01.tyun.cn.key > mongo01.tyun.cn.pemcat mongo02.tyun.cn-signed.crt mongo02.tyun.cn.key > mongo02.tyun.cn.pemcat mongo03.tyun.cn-signed.crt mongo03.tyun.cn.key > mongo03.tyun.cn.pemscp mongo01.tyun.cn.pem ca.pem client.pem root@mongo01.tyun.cn:/root
scp mongo02.tyun.cn.pem ca.pem root@mongo02.tyun.cn:/root
scp mongo03.tyun.cn.pem ca.pem root@mongo03.tyun.cn:/root1.2.3.4.5.6.7.8.9.10.请注意,我还将 CA 证书(ca.pem)复制到每个服务器。这是启动 mongod 实例时对主机名验证的要求。我还将 client.pem 文件复制到 mongo01,以便在 x509 身份验证数据库中创建用户后,我们可以连接并运行管理命令。
05修改之前分片集群的配置文件之前的配置文件:
复制systemLog: destination:file
logAppend: true path: /var/log/mongodb/mongod.logstorage: dbPath: /var/lib/mongo
journal: enabled: true wiredTiger: engineConfig: cacheSizeGB: 1processManagement: fork: true pidFilePath: /var/run/mongodb/mongod.pid timeZoneInfo: /usr/share/zoneinfo
net: port: 27017 bindIp: mongo01.tyun.cnsecurity: authorization:enabled
keyFile: /etc/mongo.keyfilereplication: replSetName: rs01.2.3.4.5.6.7.8.9.10.11.12.13.14.15.16.17.18.19.20.21.22.23.修改为:
复制systemLog: destination:file
logAppend: true path: /var/log/mongodb/mongod.logstorage: dbPath: /var/lib/mongo
journal: enabled: true wiredTiger: engineConfig: cacheSizeGB: 1processManagement: fork: true pidFilePath: /var/run/mongodb/mongod.pid timeZoneInfo: /usr/share/zoneinfo
net: port: 27017 bindIp: localhost,mongo01.tyun.cn tls: CAFile: /etc/mongo/ca.pem certificateKeyFile: /etc/mongo/mongo01.tyun.cn.pem mode:requireTLS
security: clusterAuthMode:x509
replication: replSetName: rs01.2.3.4.5.6.7.8.9.10.11.12.13.14.15.16.17.18.19.20.21.22.23.24.25.26.mongo01
复制mongod --bind_ip 127.0.0.1,mongo01.tyun.cn \ --replSet rs0 \ --dbpath /data \ --logpath /data/mongod.log \ --port 27017 \ --fork \ --wiredTigerCacheSizeGB 1 \ --sslMode requireSSL \ --sslPEMKeyFile /root/node1.pem \ --sslCAFile /root/ca.pem \ --clusterAuthMode x5091.2.3.4.5.6.7.8.9.10.11. 复制systemLog: destination:file
logAppend: true path: /var/log/mongodb/mongod.logstorage: dbPath: /var/lib/mongo
journal: enabled: true wiredTiger: engineConfig: cacheSizeGB: 1processManagement: fork: true pidFilePath: /var/run/mongodb/mongod.pid timeZoneInfo: /usr/share/zoneinfo
net: port: 27017 bindIp: localhost,mongo01.tyun.cn tls: CAFile: /etc/mongo/ca.pem certificateKeyFile: /etc/mongo/mongo01.tyun.cn.pem mode:requireTLS
security: clusterAuthMode:x509
replication: replSetName: rs01.2.3.4.5.6.7.8.9.10.11.12.13.14.15.16.17.18.19.20.21.22.23.24.25.26.mongo02
复制mongod --bind_ip 127.0.0.1,mongo02.tyun.cn \ --replSet rs0 \ --dbpath /data \ --logpath /data/mongod.log \ --port 27017 \ --fork \ --wiredTigerCacheSizeGB 1 \ --sslMode requireSSL \ --sslPEMKeyFile /root/node2.pem \ --sslCAFile /root/ca.pem \ --clusterAuthMode x5091.2.3.4.5.6.7.8.9.10.11. 复制systemLog: destination:file
logAppend: true path: /var/log/mongodb/mongod.logstorage: dbPath: /var/lib/mongo
journal: enabled: true wiredTiger: engineConfig: cacheSizeGB: 1processManagement: fork: true pidFilePath: /var/run/mongodb/mongod.pid timeZoneInfo: /usr/share/zoneinfo
net: port: 27017 bindIp: localhost,mongo02.tyun.cn tls: CAFile: /etc/mongo/ca.pem certificateKeyFile: /etc/mongo/mongo02.tyun.cn.pem mode:requireTLS
security: clusterAuthMode:x509
replication: replSetName: rs01.2.3.4.5.6.7.8.9.10.11.12.13.14.15.16.17.18.19.20.21.22.23.24.25.26.mongo03
复制mongod --bind_ip 127.0.0.1,mongo03.tyun.cn \ --replSet rs0 \ --dbpath /data \ --logpath /data/mongod.log \ --port 27017 \ --fork \ --wiredTigerCacheSizeGB 1 \ --sslMode requireSSL \ --sslPEMKeyFile /root/node3.pem \ --sslCAFile /root/ca.pem \ --clusterAuthMode x5091.2.3.4.5.6.7.8.9.10.11. 复制systemLog: destination:file
logAppend: true path: /var/log/mongodb/mongod.logstorage: dbPath: /var/lib/mongo
journal: enabled: true wiredTiger: engineConfig: cacheSizeGB: 1processManagement: fork: true pidFilePath: /var/run/mongodb/mongod.pid timeZoneInfo: /usr/share/zoneinfo
net: port: 27017 bindIp: localhost,mongo03.tyun.cn tls: CAFile: /etc/mongo/ca.pem certificateKeyFile: /etc/mongo/mongo03.tyun.cn.pem mode:requireTLS
security: clusterAuthMode:x509
replication: replSetName: rs01.2.3.4.5.6.7.8.9.10.11.12.13.14.15.16.17.18.19.20.21.22.23.24.25.26. 06测试使用下面的命令进行连接:
复制mongo --host mongo01.tyun.cn:37017 --tls --tlsCertificateKeyFile client.pem --tlsCAFile ca.pem[root@mongo01 ~]# mongo \
--host mongo01.tyun.cn:37017 \ --tls \ --tlsCertificateKeyFile client.pem \ --tlsCAFile ca.pem \ --authenticationDatabase admin -u root1.2.3.4.5.6.7.8.9.And run initiate to create the replica set:
复制> rs.initiate( { _id: "rs0", version: 1, members: [ { _id: 0, host: "mongo01.tyun.cn:27017" }, { _id: 1, host: "mongo02.tyun.cn:27017" }, { _id: 2, host: "mongo03.tyun.cn:27017" } ] })1.2.3.4.5.6.7.8.9.10.11.我们再次插入一条文档:
复制[root@mongo01 ~]# mongo \
--host mongo01.tyun.cn:37017 \ --tls \ --tlsCertificateKeyFile client.pem \ --tlsCAFile ca.pem \ --authenticationDatabase admin -u rootrs0:PRIMARY>use test
switched to db test
rs0:PRIMARY> db.ssl.insert({content: Can you see me again?})WriteResult({ "nInserted" : 1 })1.2.3.4.5.6.7.8.9.10.11.12.13.14.我们再次使用 tcpdump 查看(我们在 37017 上启动了一个启用 TLS 的集群):
复制[root@mongo01 ~]# tcpdump -i eth0 host mongo01.tyun.cn and port 37017 -X1.其输出如下:
复制02:37:01.462175 IP mongo01.tyun.cn.37017 > mongo03.tyun.cn.38990: Flags [P.], seq 10689:11047, ack 16108, win 1432, options [nop,nop,TS val 2739707105 ecr 2739701280], length 358 0x0000: 4500 019a ec03 4000 4006 10f7 0a14 1413E.....@.@.......
0x0010: 0a14 1429 9099 984e a10f d9ab 1b5d 7974 ...)...N.....]yt
0x0020: 8018 0598 3df0 0000 0101 080a a34c 9ce1 ....=........L..
0x0030: a34c 8620 1703 0301 6116 9809 0107 e22e .L......a.......
0x0040: e871 6129 a35f 3519 8031 9cc7 7302 7a80 .qa)._5..1..s.z.
0x0050: 6626 2c07 7bb6 9ed2 4365 d4c6 372d df72 f&,.{...Ce..7-.r 0x0060: ef8e 9f26 676f 2973 de04 42f0 8f23 d0db ...&go)s..B..#..
0x0070: bccf 272b 23ac 4b5c 3e7f c58c 0677 be34 ..+#.K\>....w.4 0x0080: 8588 af2b d51a 48b2 6443 33ce f2f3 ad23 ...+..H.dC3....# 0x0090: 190b f9c3 9b31 3f43 21d1 64af f319 af6b .....1?C!.d....k 0x00a0: 68f3 8dec 8d5b 1a76 da2b 1204 0aa5 9a6b h....[.v.+.....k 0x00b0: ceb6 d26c 3618 8c12 92d1 2044 8970 dc85 ...l6......D.p.. 0x00c0: 51ec 4a7b 1e77 5707 5d64 84c2 8237 d827 Q.J{.wW.]d...7. 0x00d0: 734b abde ba1f e3f2 864f 8960 7bdb 76c6 sK.......O.`{.v.
0x00e0: a30f b2de 65de 577f 9108 3506 65fa aa0a ....e.W...5.e...
0x00f0: bfef 048e f969 d1ab 88fc 977d 611c 92eb .....i.....}a...
0x0100: 6722 bcca c22f 0316 15a0 20c7 f298 cd61 g".../.........a 0x0110: d882 6312 7b01 aca6 9cfd 339b 1e76 2206 ..c.{.....3..v".
0x0120: e377 77ef fd86 c0a3 1cad 862a ca02 ca3b .ww........*...; 0x0130: c9ca 06d2 02a3 6567 3c05 cff7 bbe0 c908 ......eg<.......
0x0140: 737b 7b33 27f2 cd3f 5f86 83be e11e 67b5 s{{3..?_.....g. 0x0150: 7a1c fe32 ae2b ef24 ebed 1637 753a 0555 z..2.+.$...7u:.U 0x0160: 0fde 0dd5 b7a4 2fec c437 cb70 6d31 587c ....../..7.pm1X| 0x0170: 5483 4aaa e28a 9676 232e 294a e791 5bfc T.J....v#.)J..[. 0x0180: 71e4 9338 a66b c3d5 fb26 6252 96ff 446f q..8.k...&bR..Do 0x0190: e64a 977b 7623 836d 5a87 .J.{v#.mZ.1.2.3.4.5.6.7.8.9.10.11.12.13.14.15.16.17.18.19.20.21.22.23.24.25.26.27.因为通信协议加密了,就会发现上述输出的信息不太好理解。
有了通信协议的加密,我们就可以拍着胸脯说:『已经很安全了!』。这只是安全的一方面,要想更安全,还需要启用用户认证以及对每个用户进行细粒度的权限控制。
参考链接:
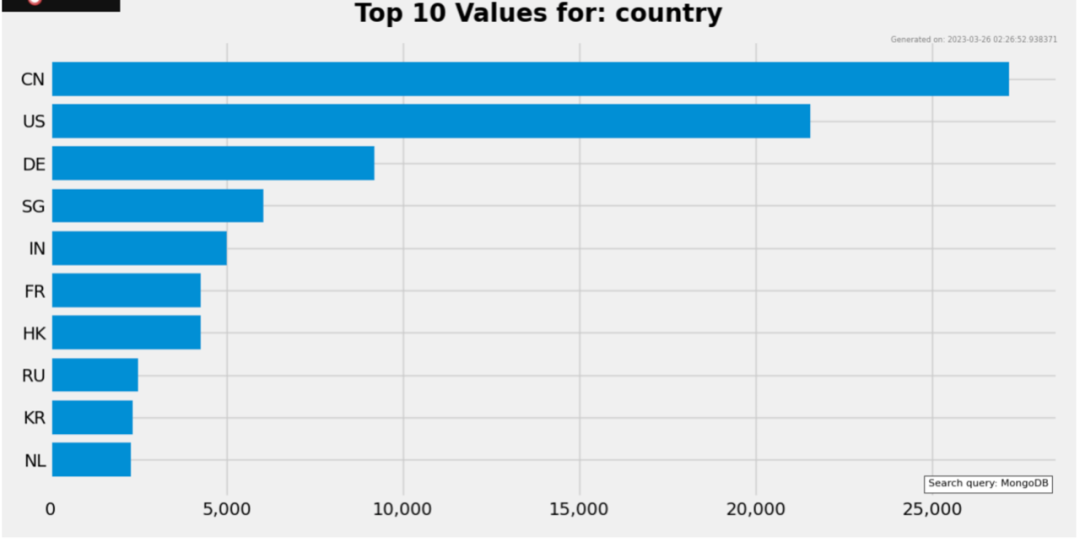
https://docs.mongodb.com/manual/tutorial/configure-x509-client-authentication/#add-x-509-certificate-subject-as-a-userhttps://www.mongodb.com/docs/manual/core/security-x.509/#member-x-509-certificates如果我们想让自己的 MongoDB 数据放在公网上访问,那么最优先考虑的就是安全因素,最好不让 MongoDB 暴露在外部。其实有很多 MongoDB 都暴露在了公网,并且是裸奔的形式,也就是说任何人在任何地方都可以随便登录到数据库中。以下是一个截图:
以下是上述的总结也是一些注意事项。因为非常重要,所以再三强调。
需要注意的事项:
HTTP 的状态接口必须禁用RESTful API 必须禁用JSON API 必须禁用连接 MongoDB 时使用 SSL 加密启用认证授权使用 IP 限制,地址段越小越好使用密码,密码强度越高越好对 MongoDB 特定的端口进行防护使用特定的用户访问特定的数据库,而不是使用高权限账号另外,保证数据库的访问安全非常重要,同时也需要保证数据的安全性,做好必要的数据备份。愿大家的 MongoDB 越来越安全,且行且珍惜,我们下期再见。
(责任编辑:数据库)